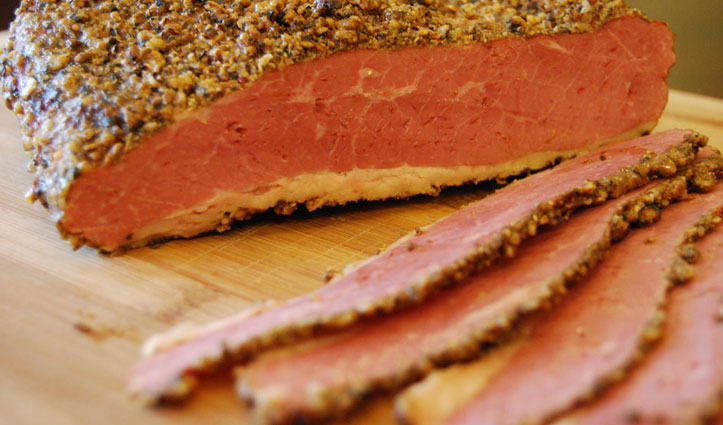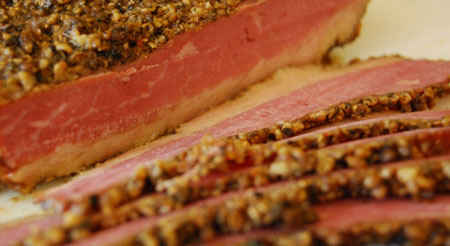
My Beef Pastrami recipe will probably be one of the best things to come off of your smoker that you may never have envisioned making yourself – it is after all a deli meat. However, it’s not much harder to make your own pastrami than it is to make a regular barbecued beef brisket. This beef pastrami recipe will actually be part of a two-part guide on making homemade pastrami. This is the shorter, easier of the two to make – don’t be mistaken though, this recipe will turn out some of the best pastrami you’ve ever had. It may even rival some of the great pastrami from your favorite New York delicatessen.
 Now I can’t think of an amazing slice of beef pastrami without craving a Reuben sandwich. So I’ll also be sharing one of my instant favorites – Rusty’s Reuben. It’s sort of an East meets West experience gone totally a-Rye (get it?). Sandwich puns… I know, I know – let’s get on with the show.
Pastrami vs. Corned Beef
The term "corned" beef gets its name because traditionally meat was cured with chunks or “corns” of salt that looked like corn kernels. To preserve the beef it was salted heavily on both sides and left to cure in a cold environment for several days. The salt and nitrates penetrate into the meat preserving the meat and making it corned beef. If you were to leave it corned beef you’d normally boil it to prepare it.
Pastrami starts off as salt-cured, or “corned”, beef which is then rubbed and lightly smoked. This process was a Romanian specialty brought to the U.S. via New York during a wave of Romanian Jewish immigration. Traditional New York-style pastrami is also steamed to finish the cooking process and helps to tenderize the meat.
Can you skip the corned beef and just use a regular brisket for pastrami? No, curing the meat is part of the process. For more information on curing vs. brining stay tuned for my future article and I'll show you how to make your own corned beef too.
What Cut of Meat to Use for Pastrami?
Well, the choice is yours. The usual cuts to use are beef brisket (point or a cut flat), beef round and traditionally beef navel. Beef navel has the perfect amount of fat and may very well be considered the gold standard by connoisseurs; however it may not be a cut you’ve seen before. Beef round is very lean compared to the others which is not necessarily more desirable in this case. Beef brisket has also become a popular choice too and just happens to come in the form we’re looking for – corned beef.
In this recipe we’ll be using brisket flats that are pre-“corned”. If you have the time you can also do this yourself which I will show you in part two. After the beef is corned you would simply follow the rest of the recipe below.
How to Make Pastrami
For the best results, it’s best to have a very thin layer of fat on your brisket to make pastrami, less than 1/4 inch. Packaged corned beef will normally be pre-trimmed, but may require a little more trimming. As far as brands go I’ve had good experience with Shenson and Grobbels brand corned beef. Your local grocery store may carry another brand, but you’ll probably find you prefer a specific brand. For this recipe I used a Shenson flat cut brisket from Costco.
Before smoking the corned beef you must first de-brine it to remove some of the salt from the meat. The curing process is already complete – this is a permanent change to the meat. But in order for our end-product to be edible we’ll definitely need to remove some of the salt used during the curing process. This is done by what I’m calling de-brining. A brine works by osmosis. To put it simply a salt-water solution will seek to equalize between two parts. With meat, the salt-water solution would be absorbed into the meat. The same process can be reversed to pull out or reduce the saltiness of our solution by soaking the meat in just water. As it seeks to equalize the solution, this time from inside the meat, some of the salt will be drawn out. To make this happen we will soak the corned beef in cold water, changing it several times over a period of 6-24 hours.
De-brining
1) Remove the brisket flat from the packaging. Toss any spice packets – we won’t need them for making pastrami. In fact, be sure to avoid purchasing briskets with broken spice packets.
2) Trim any excess fat from the brisket, leaving 1/4 inch or less. Be sure to trim it a little more than you would a standard barbecued beef brisket (we won’t be cooking it as long so it won’t simply melt away).
3) Soak brisket in cold water for 6 hours or more. Changing the water every 2-3 hours. Most of the saltiness will be drawn out in the first 6 hours (as you can see with the pictures taken at 2 hour intervals when changing the water). After 6 hours it is up to personal preference. I went by the color of the water and stopped after changing the water 3 times, but a good rule of thumb is to soak 2 hours per pound.
4) Rinse off and pat the brisket dry. You can let air dry while you prepare the rub.
5) Prepare the rub using a mortar and pestle  or a spice grinder
 to grind the peppercorns and seeds. I also prefer to toast these spices once cracked. Be careful, spices burn quickly and will go bitter.
6) Apply the rub to the brisket. You may not use all of it, but don’t be too worried about over-doing it. There will only be a small amount on each slice and a little is lost in the steaming process.
Smoking Pastrami
Use a mild wood for smoke. Anything too strong will overpower the flavor of the pastrami. I recommend fruit woods like apple or cherry or other mild woods like maple or oak. Another fun choice is Pimento wood.
Fire up your pellet smoker, stick burner, kettle smokenator or stove-top smoker . Yeah, that’s right I said you could smoke meat inside. Whatever you’ve got will work just fine. You only want a fraction of the smoke you’d use for a regular brisket. For wood burners, try only adding wood for the first three hours or so for starters.
Warm your smoker up to 225°F. Put it on your smoker cold and let it go for 1.5-2 hours before spraying hourly with a little juice and olive oil (I mixed in a tiny amount of truffle oil too). Cook the brisket until it reaches an internal temperature of 150°F. Remove from your smoker. The curing and the steaming process are what will make the meat tender.
Steaming Pastrami
From here there are a few different ways to steam the pastrami. Use whatever option you have available to you. However, if you prefer to skip the NY-style steamed-finish then I’d recommend cooking to 165°F and stick in your cooler cambro to rest for 1 hour.
Oven Method
Transfer it to a 200-250°F oven to using a broiler pan or a pan where you can fill the bottom with a few cups of water keeping the meat out of the water. Cover it with foil and then cook for another 2 to 4 hours until tender.
Pressure Cooker Method
This is my preferred method. Using a pressure cooker you can really get the old fashioned steamed pastrami finish. Fill with 3 cups of water and place the meat on a rack or disposable pan to keep it out of the water as much as possible. Cook for 20-30 minutes depending on size and heat source. When finished, remove the pressure cooker from heat and let the pressure “naturally release” before opening. This is important for the texture of the meat and will take approximately 10-15 minutes.
Finished
 When you are finished allow to cool overnight in the fridge. This will allow the flavor to set and the meat will be easier to slice deli-thin when it’s cold. If you have a good meat slicer like the Weston HD Food Slicer
  that is definitely the way to go.
Now go "pile it high" on top of some rye bread or bet yet on top of your favorite burger!